


Table of contents
What is svelte ?
Svelte is a new approach to building user interfaces. Whereas most frameworks like React and Vue JS do most of their work in the browser, Svelte shifts that work into a compile step that happens when you build your app, like most modern frameworks, svelte also allows you to create reusable components.
Instead of using techniques like virtual DOM diffing,Svelte writes code that surgically updates the DOM when the state of your app changes.
Why use svelte?
30% Faster than most other frameworks
Ease of use
Beginner friendly
Write less code
Truly reactive
Getting started with svelte
In this article, we'll be building the next million-dollar app idea :), the world's greatest to-do list app. There are several ways to start up your svelte project, in this article we'll be using the method showed in svelte docs, which makes use of npx. Open up your terminal or Command prompt and type the commands
npx degit sveltejs/template million-dollar-app
cd million-dollar-app
npm install
npm run dev
After that's done, our svelte project should be active on localhost:8000 or if that's taken it would use a different port, which will be displayed on your terminal.

It starts off with a basic template that displays hello world.
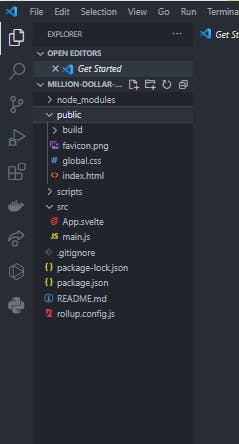
We start off with a similar folder structure to most other frameworks, our custom components and other source files go in the src folder and public assets like images go in the public folder.
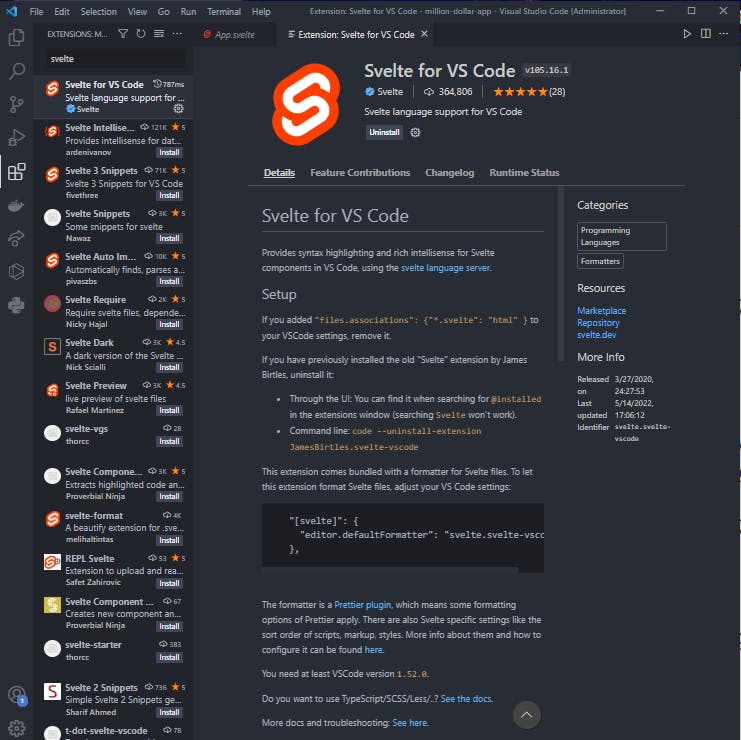
Installing svelte extension for VS Code
By default, VS Code can't read the .svelte extension, in order to get syntax highlighting on our svelte project, we need to install the svelte extension. Open up your extensions tab and search for svelte, it should be the first result, to proceed to install it.
Basics of svelte
Before building our project, we need to understand the basics of svelte
Creating Components
Every svelte component consists of three(3) optional tags, a script tag (which stores our JS logic and functions), an HTML element tag (which contains the content of our page) and a style tag (which contains the styling of our page). The demo below shows a structure of a svelte component.
<script>
    const info=()=>{
        console.log("Building a million dollar app")
    }
</script>

<main>
    <h1> A million dollar app </h1>
</main>

<style>
    h1{
        color:blue
    }
</style>
Directives
We need a way to fire events or control elements behavior when a button is clicked, Input field value changes and so on, svelte provides an easy way to do that, which are called Directives.
Svelte offers several directives, to get to know all of them, Check out the svelte docs
On Directive
The on directive follows the syntax on:eventname We chain events to HTML elements by using this syntax. Here's an example of a button that logs out "Hello world!", when it's clicked.
<script>
const sayHello=()=>{
console.log("Hello world")
}
</s>

<div>
<!-- using a named function-->
<button on:click={sayHello}>Say Hello</button>

<!-- using an inline function -->
<button on:click={()=> console.log("Hello world")}>Say Hello</button>
</div>
Modifiers can also be added to DOM events, which define some certain actions on it. Like in the demo below, the submit event is chained with a preventDefault modifier, this modifier calls the event.preventDefault() before running the event handler.
<script>
const handleSubmit=()=>{
    console.log("Submitting!!!")
}
</script>

<main>
  <form on:suibmit|preventDefault={handleSubmit}>
      <!-- Submit event is prevented and the page dosen't reload-->
  </form>
</main>
Bind Directive
The bind directive follows the syntax bind:property This is used to allow the flow of data from elements to a particular variable. The example below shows the binding of an input field value to a variable.
<script>
let username=""
</script>

<main>
  <input type='text' bind:value={username}/>
</main>
To get more info on property on binding, check out the svelte docs
Template syntax
Svelte provides several template syntax which can be used for conditional rendering, lopping over data and so on.
IF template syntax
This can be used to conditional render data in the HTML based on a condition or state value, it follows the syntax {#if expression}...{/if} here's an example.
<script>
const show= false
</script>

<div>
{#if show}
<h1>This content is hidden</h1>
{/if}
</div>
Each template syntax
This can be used to loop over data, it follows the syntax {#each expression as name}...{/each}, here's an example.
<script>
const names = ["dexter","Iyosayi","batman","joker"]
</script>

<div>
{#each names as name}
<p> {name} </p>
{/each}
</div>
To learn more about svelte template syntax, refer to the svelte docs, they give a more in dept view of template syntax and introduce others which were not mentioned here. And that's pretty much all we need to know about svelte to build out our app. **
Building Our Million Dollar Web App
Our to-do list composes of two major components,
A to-do header and a to-do item, the to-do header contains the form for adding a new to-do, while the to-do item displays the actual to-do content.
We'll start by creating a components folder inside the src folder and then, we create two component files, TodoHeader.svelte and Todo.svelte. Then we import them into App.svelte.
<script>
    import TodoHeader from './components/TodoHeader.svelte'
    import Todo from './components/Todo.svelte'
</script>
App.svelte
In App.svelte, we'll create an array to store our todos, for our todo items they're going to contain 3 key value pairs, A todo textCotent, an id and done state( which by default is false),
// demo todo
const demo_todo = {
    textContent:"Go to mall",
    id:4,
    done:false
    // The id dosen't have to be a number, it just has to be unique
}
a state variable to track the current input value, a function to add new todos, a function to delete a todo and lastly a function to toggle todo state, between finished and unfinished as seen below. We'll also loop over our todos and render the Todos passing in the todo props.
Then we pass in the handleAdd function and inputValue as props to the TodoHeader component and also loop over our todos and render the Todo component passing in the todo props (id, textContent, changeDoneState, handleDelete).
<script>
    let inputValue =''
    let todos = []

    /*
    **  @params id- unique todo identifier
    **  interface id: string | number
    */
    const handleDelete=(id)=>{
        todos = todos.filter(todo => todo.id !== id)
    }


    /*
    **  @params newTodo- object which contains textCotent for a todo and id
    **  interface todo {textContent:string, id:string|interger, done:boolean}
    */
    const handleAdd=(newTodo)=>{
        todos = [newTodo, ...todos]
    }

    /*
    **  @params id- unique todo identifier
    **  interface id: string | number
    */
    const changeDoneState=(id)=>{
        todos = todos.map(todo => {
            if(todo.id === id){
                return {...todo, done:!todo.done}
            }
            return todo
        })
    }

    // importing our components
    import TodoHeader from './components/TodoHeader.svelte'
    import Todo from './components/Todo.svelte'
    </script>

    <main class='container'>
        <TodoHeader inputValue={inputValue} handleAdd={handleAdd}/>
        <section class="container__todosWrapper">
            {#each todos as todo}
                <Todo textContent={todo.textContent} id={todo.id} done={todo.done} handleDelete={handleDelete} changeDoneState={changeDoneState}/>
            {/each}
        </section>
    </main>

    <style>
    *, *::before, *::after {
        box-sizing: border-box;
    }

    .container {
        max-width:500px;
        margin:3rem auto;
        padding:1rem;
        width:70%;
        border-radius: .2rem;
        box-shadow: 1px 2px 7px #7e7e7e;
    }

    .container__todosWrapper{
        height: 50vh;
        max-height:450px;
        overflow-y: auto;
        border:1px solid #f2f2f2;
        padding:1rem;
    }
</style>
TodoHeader Component
The TodoHeader component is going to contain two major things a header text saying Your todos, and a form field for creating new todo. We'll start by exposing our props with the export keyword, then we'll bind the submit event of our todo form to a function which makes some checks on the form field, before calling the handleAdd function to create a new todo item, we'll also bind the form input value to our inputValue prop. as seen below.
For this app we'll use datetime to generate a unqiue id for each todo
<script>
    // varaibles
    export let inputValue;

    // Functions
    export let handleAdd;

    const createTodo=()=>{
        if(inputValue.trim() !=='' & inputValue !== null){
            const newTodo = {textContent:inputValue, id: new Date().toISOString(), done:false}
            handleAdd(newTodo)
            inputValue=''
        }
    }
</script>

<header>
    <h2>Your todos,</h2>
    <form class='container__form'on:submit|preventDefault={createTodo}>
        <input type='text' bind:value={inputValue} class='--rounded'/>
        <button class='--rounded'>Add</button>
    </form>
</header>

<style>
    *, *::befor, *::after {
        box-sizing: border-box;
    }

    .container__form input {
        border:none;
        outline:none;
        background:#f9f9f9;
        flex:.9;
        padding-inline:.8rem;
    }
    .container__form button {
        border:none;
        outline:none;
        background: #0c3bb4;
        flex:.1;
        color:white;
        cursor:pointer;
        padding-inline: .4rem;
    }
    .container__form .--rounded {
        padding-block:.6rem;
        border-radius:.2rem;
    }
    .container__form {
        display:flex;
        justify-content:center;
        align-items: center;
        gap:1rem;
        }
</style>
Todo Component
Similarly for the todo component we'll start by exposing our props, textContent, id, done, handleDelete, changeDoneState.
<script>

    // Variables
    export let textContent
    export let id
    export let done

    // functions
    export let handleDelete
    export let changeDoneState


</script>

<article class='todo'>
        <input type='checkbox' checked={done} on:click={()=> changeDoneState(id)}/>
        {#if done}
            <p class='--done'>{textContent}</p>
        {:else}
            <p>{textContent}</p>
        {/if}
        <button on:click={()=>handleDelete(id)}>Delete</button>
</article>


<style>

    *, *::before, *::after {
        box-sizing: border-box;
    }

    .todo {
        display: flex;
        justify-content: space-between;
        align-items: center;
        padding-inline:.4rem;
        gap:.5rem;
    }
    .todo p {
        background:#f9f9f9;
        flex:.9;
        padding: .7rem .9rem;
    }
    .todo .--done {
        text-decoration: line-through;
        color:#444445;
    }
    .todo button {
        cursor:pointer;
        border:none;
        background:#b80a0a;
        color:white;
        font-size:.9rem;
        flex:.1;
        padding: .65rem .9rem;
    }
</style>
Using the if template syntax we conditionally rendered a different UI when the todo was done an not done, we also bind the delete button click event to the handleDelete function and the changeDoneState function to an input checkbox.
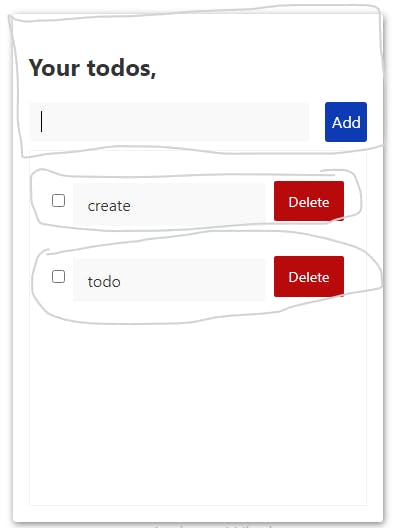
And there we have it, our million dollar web app ready to be shipped, now all we have todo is get someone to pay a million dollars for it, which is relatively easy :).
Conclusion
Svlete is awesome and lightweight for building out web apps, what do you plan on building with it ?